Golang 文件上传
|
|
可同时上传多个文件
分别使用Postman git bash里的curl Windows子系统里的curl 调用
Postman
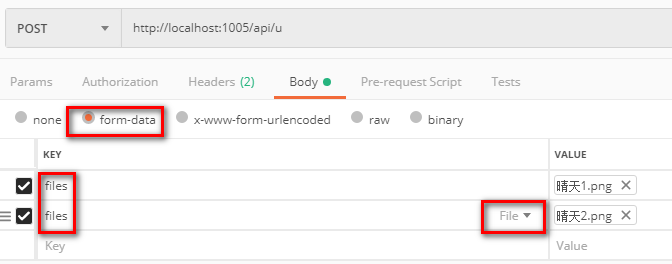
key 的值对应 上面代码里的 files := form.File["files"] 这一段
Kali
|
|
一开始的时候提示 setting file failed, 还以为是不支持中文啥的 后来发现子系统的路径是不一样的 (─.─|||
git bash
|
|
--request选项可以用-X代替- 而如果 url 放在最后, 就不用写 –url 了
--header则可以使用-HSaveUploadedFile的时候, 对应的目录必须事先创建好, 否则报错
Vue上传页面(el-upload)
加了本地存储来存储token
|
|
-
form.File["files"]和name="files"这两个需要对应, 最终会体现在header里 -
使用
:headers="uploadHeaders"1 2 3 4 5uploadHeaders: { token: "" } this.uploadHeaders.token = token;这样的方式来让上传组件带上咱自己的token
-
action="/api/u"和this.$http.get("/index/",{headers:{'token' : token}})这种不需要带域名端口的方式需要在项目根目录下创建
vue.config.js, 内容如下1 2 3 4 5 6 7 8 9 10 11 12 13 14 15 16 17 18 19 20 21 22 23module.exports = { devServer: { proxy: { '/api': { target: 'http://localhost:1005/api', ws: true, changeOrigin: true, pathRewrite: { '^/api': '' } }, '/index': { target: 'http://localhost:1005/index', ws: true, changeOrigin: true, pathRewrite: { '^/index': '' } } } } }或者 简单点
1 2 3 4 5 6 7 8 9 10 11 12 13 14 15 16module.exports = { devServer: { proxy: { '/api': { target: 'http://localhost:1005', //代理接口 ws: true, changeOrigin: true }, '/index': { target: 'http://localhost:1005', //代理接口 ws: true, changeOrigin: true } } } }这样的方式不仅让调用更简单, 同时还能跨域, 当然后端也要加一句
g1.Use(middlewares.JWTAuth(),cors.Default())